Features
Opinion
Tech
Seven steps of colour management
Improve colour matching with these tips
March 17, 2023 By Angus Pady
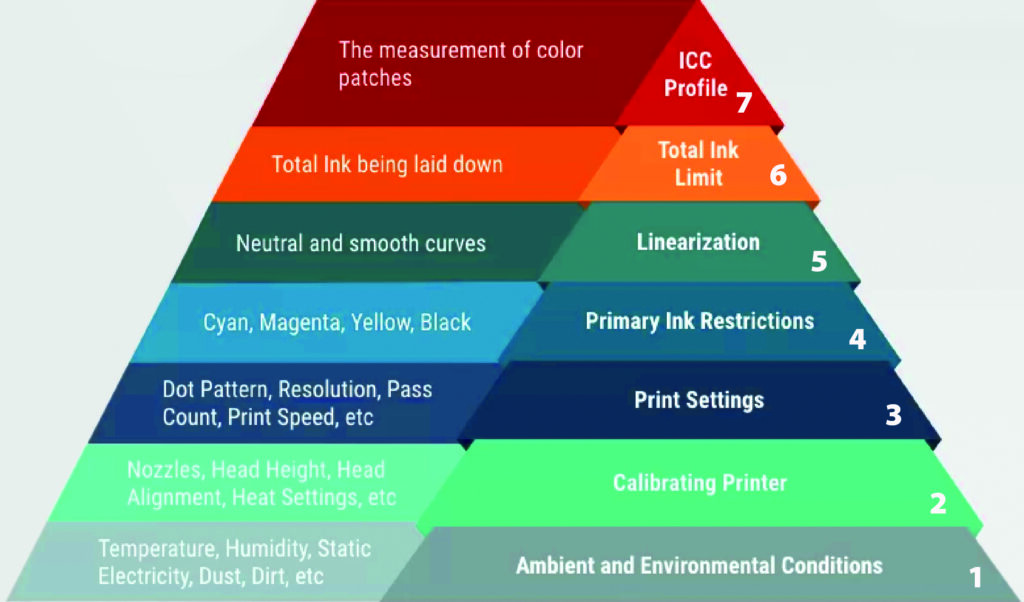 Steps to follow for effective colour management. Photo © Angus Pady
 Dye sublimation printing involves the transfer of dye onto a substrate using heat and pressure. It is a popular method for printing high-quality images and graphics on a variety of materials, including fabric, ceramic, and plastic.
One of the main challenges of dye sublimation printing is matching the printed image’s colours to the original as closely as possible. In this article, we will look at the process of calibrating your dye sublimation printer, some areas where you can get into trouble and a few techniques to maximize the final result. First, let’s discuss the goal. Obviously, we want to have an accurate colour match. The greys must be neutral and colours vibrant, but not oversaturated. The road to getting there requires a thorough understanding of seven key steps, which can be applied to almost all kinds of printing processes.
Dye sublimation challenges: Blotches
Modelled blotches spots usually point to too much moisture in the paper. This is even more pronounced on hard non-porous material. Use additional layers of Kraft paper to absorb excess moisture. Further, your environment should not have a high amount of humidity.
Blurred/ doubled image
The ink is bleeding, or the paper is moving during the pressing, which causes a ghosting image. If you pull the paper off too soon or your transfer is done too quickly, you can get rough edges.
Transfer lines
These can be alleviated by reducing the pressure. Over time you will learn how much pressure is required for various times and pressure. This is only determined by testing.
Faded images
One would think a longer transfer time would yield a denser black. The reality is dye sublimation chemistry will reach a point where too much heat and transfer time decreases the ink’s density. If you’re getting brown blacks, first decrease the time in five-second increments. I always start with time and then pressure.
Colour management walk-through
Every RIP software will walk you through similar steps when creating a new media setup. It’s beyond the scope of this article to discuss every step in detail, but let’s focus on the ones with the biggest impact.
Step 1: Ensure your environment is not too humid, as this can cause issues with dye-sub.
Step 2: Calibrate your device. Check the nozzles and alignment. If your printer has an internal calibration, then that needs to be done.
Step 3: Choose the optimal printer settings, print speed, and dot pattern. My trick is to look at what the manufacturer has done in the past. Their colour may not be ideal for your printer but they usually know the optimal combination of printer settings to use.
Step 4: Determine primary ink restrictions. This is one of the most important steps as it will determine the gamut of your printer. Most printers, when unrestricted, will print too much ink. Your goal is to find the most ink that gives you the highest chroma. If your device that can show you LCH, then you can use the C portion for chroma. As you measure each swatch from light to dark, the chroma will increase. At one point, the chroma will stop increasing and may even decrease. Select the swatch with the highest chroma value. Your RIP may also display a graph where you can toggle from density to chroma. Always use chroma.
Step 5: Linearization just needs to be measured and I accept the RIP settings here.
Step 6: Determine total ink limit, which is the most difficult one to figure out. Here are a few pointers. If you have over-inking at 200 to 300 per cent, and that area is wet or bleeding, then you need to stop and go back to Step 4 and reduce ink there. Ideally, you want the ink limit to be between 300 and 360. Getting to this stage may mean going back and forth between this step and step 4. When reducing in step 4, start with yellow, as it is the wateriest ink, then cyan, black and, lastly, magenta. We never have enough magenta. I test the ink limit target by rubbing various areas to see if the ink is wet or damp and if it scuffs easily.
Step 7: When profiling, you want to measure at least 900 patches. More patches will give you more accurate spot-colour matching. I start with the middle GCR setting. Start your backs at 40.
In conclusion, colour management is an essential part of the printing process, as it helps to ensure the colours of the printed image match the original as closely as possible. By following the above steps and using the right equipment, you can improve colour match and achieve excellent results with your printing projects.
Angus Pady is a G7-certified expert who has helped customers resolve colour management challenges for over 30 years. You can reach him at angus.pady@fujifilm.com.
An edited version of this article originally appeared in the January/February 2023 issue of PrintAction.
Print this page